Le Moyne College CSC-151 Microsoft Word 2003 Reference
Topics | How to ... |
| Create a document | create a new document. |
| Edit a document | open an existing document. |
| Save a document | save a document. |
| Look and feel | use document views, toolbars, rulers, and tab stops. |
| Selecting text | select text.. |
| Format a document | format text in a document - the basics. |
| Header and Footer | create and format headers and footers. |
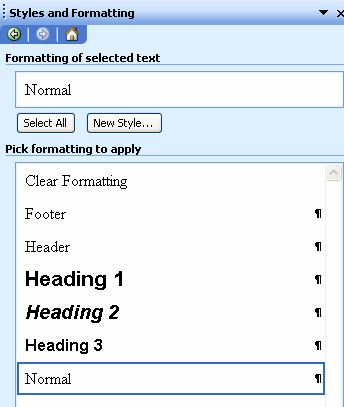
| Styles | format text using styles; modify style definition. |
| Table of Contents | automatically generate a table of contents. |
| Tables | create and format tables. |
| Advanced formatting | create a newsletter (newpaper) formatted document - columns, graphics, and wordart. |
| Tools | use spelling and grammar, word count, track changes, autocorrect options, and options. |
| Word 2007 classic menu | use spelling and grammar, word count, track changes, autocorrect options, and options. |
How to save a document.
| Menu | Toolbar | Keyboard shortcut |
| File, Save |  | <Ctrl> s
<Alt> f s |
| File, Save As... | | <Alt> f a |
Alternatives
- When saving a new document for the first time:
- Clicking on the File, Save or the File, Save As... menu command displays the 'Save As' dialog box, allowing you to enter a file name and to determine the folder where your document will be stored.
- Clicking on the Save toolbar button also displays the 'Save As' dialog box.
- Using any of the Save or Save As keyboard shortcut keys also displays the 'Save As' dialog box.
- When saving an existing document:
- Clicking on the File, Save menu command, the Save toolbar button, or using any of the Save keyboard shortcut keys will save the existing document using the original file name. The document will be saved to the same folder where it originally resides.
- Clicking on the File, Save As... menu command, or using any of the Save As keyboard shortcut keys will display the 'Save As' dialog box, allowing you to enter a file name and to determine the folder where your document will be stored.
How to use document views, toolbars, rulers, and tab stops.
Document views
There are five different views you may use to display your document.
| View | Displays the document ... |
| Normal | without showing the white-space representing the top, bottom, left, and right margins. Shows where the page breaks and section breaks are in the document, but does not display any graphics file. Example. |
| Web layout | as it would appear on a web page. Example. |
| Print layout | to match how the document would appear if printed. This view represents the WYSIWYG (What You See Is What You Get; pronounced wi-zee-wig). Example. |
| Reading layout | in WYSIWYG, showing either one or two full pages at a time. Has similar capabilities to the File, Print Preview menu command. Example. |
| Outline | in an outline format. Example. |
Toolbars
Word normally displays the Standard and Formatting toolbars immediately below the menu bar, and displays the Drawing toolbar immediately above the status line (bottom of window), as shown in this picture.
When the Standard and Formatting toolbars are on the same line (the default), there is not enough room to display all of the buttons. To gain access to the Standard toolbar buttons not displayed, you need to click on the down arrow at the end of the Standard toolbar. A similar action is required
to gain access to the Formatting toolbar buttons not displayed.
Since the purpose of toolbars is to give you quick access to common features, it makes sense to position each toolbar so that all of its buttons are visible. Fortunately, you can move the Formatting toolbar so that it appears underneath the Standard toolbar. You click and drag  found at the beginning of the Formatting toolbar to move it underneath the Standard toolbar. Here is the result of doing this.
This ability to move toolbars within the window gives you flexibility in where you position each toolbar. Options available to you are:
- A toolbar is anchored either horizontally or vertically to a window edge.
- A toolbar is floating on top of the document window.
Rulers and tab stops
The horizontal and vertical rulers are displayed when a checkmark appears to the left of the View, Ruler menu item.
The horizontal ruler may be used to change left and right margin settings, left and right indentation settings, and to set and remove tab stops.

- To change the left margin:
- Position the mouse pointer in between the 'Hanging Indent' and 'First Line Indent' buttons (found on the ruler). Hint: When you've positioned the mouse pointer in the correct location, the pointer shape will change to a double arrow
 .
.
- Click and drag the mouse to change the margin.
- To change the right margin:
- Position the mouse pointer above the 'Right Indent' button (found on the ruler). Hint: When you've positioned the mouse pointer in the correct location, the pointer shape will change to a double arrow
 .
.
- Click and drag the mouse to change the margin.
- To change the left indentation settings:
- Position the mouse over the 'Left Indent' button on the ruler. Hint: When you've positioned the mouse correctly, the help text 'Left Indent' should appear.
- Click and drag the mouse to change the left indentation for the current paragraph. Hint: When you've successfully clicked on the button, a vertical dashed line should appear.
- Position the mouse over the 'Hanging Indent' button on the ruler. A hanging indent indents all but the first line of the paragraph.
- Click and drag the mouse to change the hanging indentation for the current paragraph. Hint: When you've successfully clicked on the button, a vertical dashed line should appear.
- Position the mouse over the 'First Line Indent' button on the ruler. A first line indent indents only the first line of the paragraph.
- Click and drag the mouse to change the first line indentation for the current paragraph. Hint: When you've successfully clicked on the button, a vertical dashed line should appear.
- To change the right indentation setting:
- Position the mouse over the 'Right Indent' button on the ruler. Hint: When you've positioned the mouse correctly, the help text 'Right Indent' should appear.
- Click and drag the mouse to change the right indentation for the current paragraph. Hint: When you've successfully clicked on the button, a vertical dashed line should appear.
- To set tab stops:
- Select the type of tab stop you want by clicking on the tab stop button found to the left of the horizontal ruler. The choices you have are 'Left Tab', 'Center Tab', 'Right Tab', 'Decimal Tab', 'Bar Tab', 'First Line Indent', and 'Hanging Indent'.
- Once you've selected the tab stop, click on the horizontal ruler to position the tab stop. This will set the tab stop only for the current paragraph or only for the selected text.
- To remove tab stops:
- Click a tab stop symbol on the horizontal ruler.
- Drag this symbol off of the ruler.
The vertical ruler may be used to change top and bottom margin settings. The procedure for doing so is similar to changing the left or right margin using the horizontal ruler.
How to select text.
| Menu | Toolbar | Keyboard shortcut |
| Edit, Select All | | <Ctrl> a
<Alt> e l |
| To Select | Mouse Procedure |
| one word | Double-click on the word |
| one sentence | Press <Ctrl> and click anywhere on the sentence. |
| one line | Click to the left of the line when mouse pointer is in the left margin.
Note: when the mouse pointer is in the left margin, it looks like this  . . |
| multiple lines | Drag up or down to the left of the line when mouse pointer is in the left margin. |
| one paragraph | Triple-click anywhere on the paragraph, OR
Double-click to the left of the line when mouse pointer is in the left margin. |
| multiple paragraphs | Drag to the left of the paragraphs when mouse pointer is in the left margin. |
| entire document | Triple-click to the left of the line when mouse pointer is in the left margin, OR
Press <Ctrl> and click to the left of the line when mouse pointer is in the left margin. |
| To Select | Keyboard Procedure |
| next character | <Shift> right-arrow |
| previous character | <Shift> left-arrow |
| current position to end of word | <Ctrl> <Shift> right-arrow |
| current position to start of word | <Ctrl> <Shift> left-arrow |
| current position to end of paragraph | <Ctrl> <Shift> down-arrow |
| current position to start of paragraph | <Ctrl> <Shift> up-arrow |
| entire document | <Ctrl> a |
How to create and format headers and footers.
| Menu | Toolbar | Keyboard shortcut |
| View, Header and Footer | | <Alt> v h |
Header and Footer Toolbar

Toolbar buttons, listed from left to right
| Button | Description |
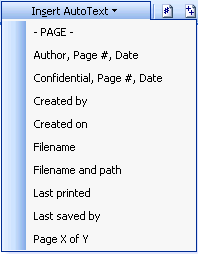
| Insert AutoText | Allows you to insert various values into the Header or Footer. The drop down list contains the following:
 |
| Insert Page Number | Insert the 'page number' field at the cursor location. |
| Insert Number of Pages | Insert the 'number of pages' field at the cursor location. |
| Format Page Number | Display the 'Page Number Format' dialog box. |
| Insert Date | Insert the current date at the cursor location. |
| Insert Time | Insert the current time at the cursor location. |
| Page Setup | Display the 'Page Setup' dialog box. |
| Show/Hide Document Text | A toggle (switch) that either displays (shows) or hides the document text. |
| Link to Previous | Available to use when more than one header or footer exists in the document. Use to make the current header or footer the same as the previous header or footer. |
| Switch Between Header and Footer | Move the cursor between the header and footer. |
| Show Previous | Move the cursor to the previous header or footer. |
| Show Next | Move the cursor to the next header or footer. |
| Close | Close this toolbar and the ability to modify headers and footers. |
How to automatically generate a table of contents.
| Menu | Toolbar | Keyboard shortcut |
| Insert, Reference, Index and Tables... | | <Alt> i n d c |
Prerequisite
In order to generate a table of contents, your document must use at least one of the heading styles (Heading 1, Heading 2, etc.).
Procedure
- Position the cursor in your document where you wish the table of contents to reside.
- Display the 'Table of Contents' tab in the 'Index and Tables' dialog box by using the menu or keyboard shortcut described above.
- Select the 'Format' you wish to use.
This drop down list gives you the following choices: From template, Classic, Distinctive, Fancy, Modern, Formal, and Simple.
Observe that the two previews change to show the appearance of the selected format.
- Select the 'Show levels' you wish to use.
Observe that the two previews change to show the number of heading levels you've selected.
- You may also wish to change the 'Show page numbers' or 'Right align page numbers' options.
- Click OK.
How to create and format tables.
| Menu | Toolbar | Keyboard shortcut |
| Table, Insert, Table... | 
 | <Alt> a i t |
| Table, Convert, Text to Table... | | <Alt> a v x |
Prerequisite
When you create a table without using existing content (without converting existing text to a table), you should know how many columns you want in your table. Specifying the correct number of columns when the table is created allows you to avoid having to make drastic changes in the width of columns. Note that it is very easy to add additional rows to an already created table. For this reason, you do not need to know the number of rows you need prior to creating the table.
When you create a table using existing content (see second Menu option above), you need to select the existing text that you want to convert to a table. The easiest type of text to convert is text that has been formatted into columns using tab stops.
Procedure
- To create a table without using existing content:
- Select Table, Insert, Table... from the menu. The following dialog box is displayed.
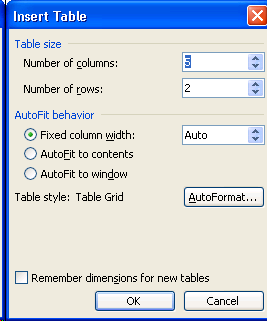
- Enter the number of columns that your table needs. You may keep the number of rows at 2 (the default value).
- Click OK button. The table will appear in your document wherever the cursor is currently located.
- Click on a table cell and enter the text. You may also insert pictures in a table cell if you wish.
- To create a table using existing content:
- Select the text (content) that you wish to convert to a table.
- Select Table, Convert, Text to Table... from the menu. The following dialog box is displayed.
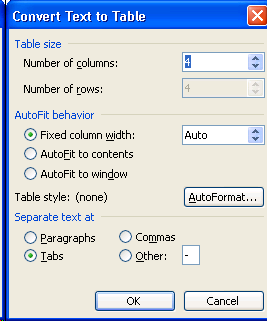
Note the "Separate text at" options at the bottom of this dialog box. Select the appropriate option based on the content you are converting.
- Click OK button. The table will appear in your document, and the selected text will now appear inside a table.
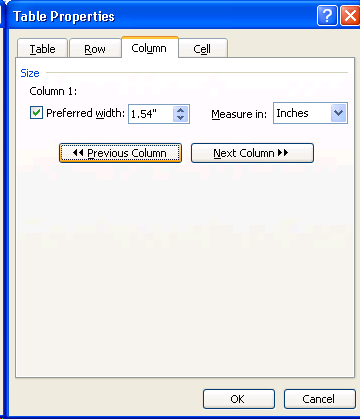
- You can adjust the width of columns in your table:
- Note that the Table Properties dialog box (shown above) also allows you to manipulate the entire Table, a Row, or a Cell.
How to create a newsletter (newpaper) formatted document using columns, graphics, and wordart.
| Menu | Toolbar | Keyboard shortcut |
| Format, Columns... |  | <Alt> o c |
| Insert, Picture, From File... |  | <Alt> i p f |
| Insert, Picture, WordArt... |  | <Alt> i p w |
The "Columns" toolbar button is on the Standard toolbar.
To format some of your document into multiple columns, giving your document the appearance of a newsletter or newspaper:
- Select the text (and pictures) that you want to format into multiple columns.
- You can format your text into multiple columns using the toolbar or menu:
- Click on the toolbar "Columns" button and select the number of columns you want.
- Select the Format, Columns... menu to display the following dialog box:
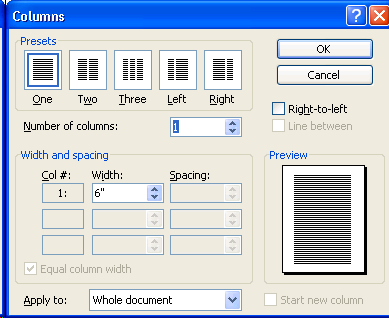
Select the various options from the dialog box and click OK button to apply the chosen column formatting.
Note that the width of each column will be the same unless you modify the "Width:" values in the "Width and spacing" section.
Note that the spacing between each column will be equidistant unless you modify the "Spacing:" values in the "Width and spacing" section.
The "Insert Picture" toolbar button is on the Drawing toolbar.
To insert a picture into your document:
- Position the cursor in your document where you want the picture to appear.
- Use the toolbar or menu to display the Insert Picture dialog box:
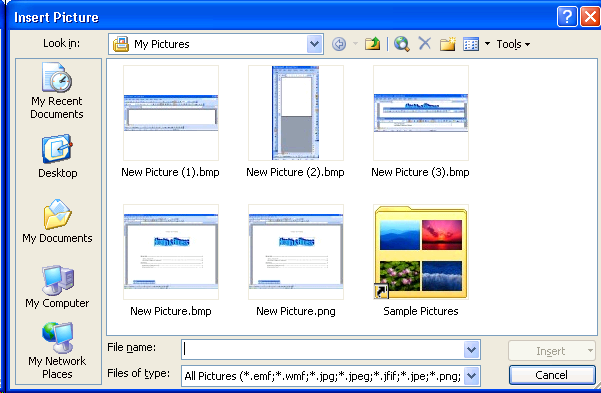
Navigate to the folder where the picture file resides.
Select the picture file and click Insert button (or double-click on the picture file).
The "Insert WordArt" toolbar button is on the Drawing toolbar.
To insert WordArt into your document:
- Position the cursor in your document where you want the WordArt to appear.
- Use the toolbar or menu to display the WordArt Gallery dialog box:
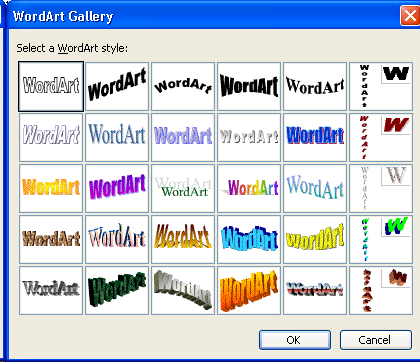
Select the WordArt style you would like to use, then click OK button to display the Edit WordArt Text dialog box.
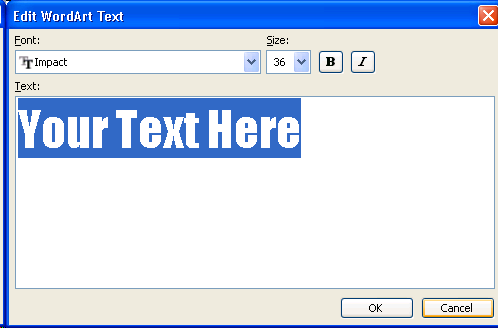
Enter your text, then click OK button. Note that you may also change the font type or size within this dialog box.
How to use spelling and grammar, word count, track changes, autocorrect options, and options.
| Menu | Toolbar | Keyboard shortcut |
| Tools, Spelling and Grammar... |  | F7
<Alt> t s |
| Tools, Word Count... | | <Ctrl> <Shift> g
<Alt> t w |
| Tools, Track Changes | | <Ctrl> <Shift> e
<Alt> t t |
| Tools, AutoCorrect Options... | | <Alt> t a |
| Tools, Options... | | <Alt> t o |
You may correct spelling and grammar mistakes by using the dialog box below:
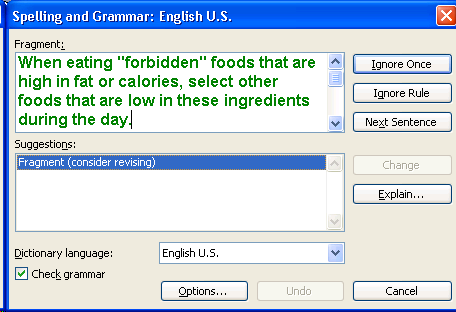
The following explains the use of the Spelling and Grammar dialog box:
| Button | Purpose |
| Ignore Once | Ignore the currently displayed error but continue looking for this type of error in the document. |
| Ignore Rule | Ignore the currently displayed error and stop looking for this type of error in the document. |
| Next Sentence | Skip this error and look for next error. |
| Change | Change the error based on the contents of the Suggestions box, then look for the next error. |
| Explain... | Display an explanation for the type of error found. |
The Word Count tool displays statistics about the current document, as shown in this dialog box:
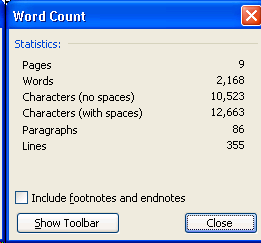
You can have Word 2003 keep track of the changes you've made to a document. When you turn Track Changes on, the Reviewing toolbar is displayed:

The following explains the use of the Reviewing toolbar. The buttons are explained from left to right.
| Button | Purpose |
| Display for Review | Select an option to determine how the changes are displayed. |
| Show | Turn on and off various options regarding what is displayed. |
| Previous | Look for a change from the current position to the start of the document. |
| Next | Look for a change from the current position to the end of the document. |
| Accept Change | Accept the currently selected change and look for the next change in the document. |
| Reject Change/Delete Comment | Reject the currently selected change (or delete the currently selected comment) and look for the next change in the document. |
| Insert Comment | Insert a comment at the current cursor position. |
| Highlight | Change the highlight color used to visually identify the changes being tracked. |
| Track Changes | Turn on and off the track changes tool. |
| Reviewing Pane | Display the reviewing pane. This typically appears at the bottom of the Window, just above the horizontal scroll bar. |
The status bar (at the bottom of the window) shows that track changes is turned on via the TRK:

The AutoCorrect options dialog box is show below:
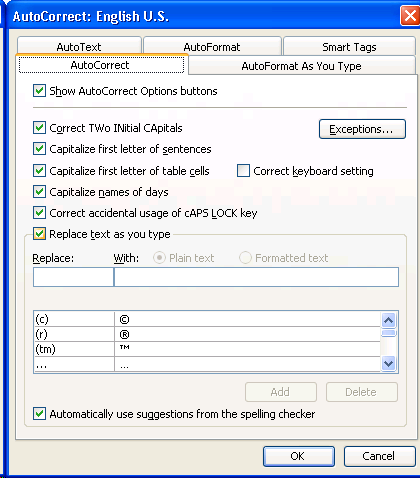
Using this dialog box, you can turn on and off various options regarding when Word will automatically correct a typing mistake that you've made.
Word 2003 has hundreds of options that you may turn on and off. The Options dialog box is shown below, with the View tab currently displayed.

To learn what each of the options does, click on the ![]() Help button to display Microsoft Office Word Help on the Tools, Options.
Help button to display Microsoft Office Word Help on the Tools, Options.
If you recently purchased a new Windows computer and Word 2007 is on this computer, you'll notice a significant difference in the user interface. While Word 2003 uses a menu (File, Edit, View, Insert, ...) and toolbars (Standard, Formatting) to provide access to its many features, Word 2007 uses something called a Ribbon. The Ribbon is simply a new name for an old idea, namely toolbars and buttons. The Word 2007 Ribbon completely replaces the Word 2003 menu.
Should you have Word 2007 on your Windows computer, you have two options for doing the Word assignments for this class:
- Use a Le Moyne PC in any of the labs found on campus. All Le Moyne PC's have Word 2003 on them.
- You can change the Word 2007 Ribbon to the Word 2003 classic menu and toolbar structure by purchasing the Classic Menu for Word 2007 (exe) from Microsoft. As of September 4, 2007, this product costs 15.99.
The CSC-151 course does not require that you purchase any software. Since all Le Moyne PCs have Word 2003 on them, and since any exams in CSC-151 will have you use Word 2003, your best option is to choose option 1 above.
Last updated on September 4, 2007


 found at the beginning of the Formatting toolbar to move it underneath the Standard toolbar.
 .
. .
.




 .
.