This describes how to use the basic formatting features found in Microsoft Excel.
| Formatting | Menu | Toolbar | Keyboard shortcut | Procedure |
The following formatting options are found on the Formatting toolbar, from left to right. | ||||
| font type | Format, Cells..., Font tab |  | Select the cell or cells then use the menu or toolbar. Each of these toolbar buttons contains a drop down list where you select the formatting option you want. | |
| font size | Format, Cells..., Font tab |  | ||
| bold | Format, Cells..., Font tab |  | <Ctrl> b | Select the cell or cells then use the menu, toolbar, or keyboard shortcut. You may also bold, italics or underline a portion of a cell value. To do this, edit the cell data and select the text that you wish to format, then use the appropriate keyboard shortcut. |
| italics | Format, Cells..., Font tab |  | <Ctrl> i | |
| underline | Format, Cells..., Font tab |  | <Ctrl> u | |
| align left | Format, Cells..., Alignment tab |  | Select the cell or cells then use the menu or toolbar. | |
| center | Format, Cells..., Alignment tab |  | ||
| align right | Format, Cells..., Alignment tab |  | ||
| merge & center | Format, Cells..., Alignment tab |  | ||
| currency style | Format, Cells..., Number tab |  | Select the cell or cells then use the menu or toolbar. Each cell must display a numeric value for this formatting to work. | |
| percent style | Format, Cells..., Number tab |  | ||
| comma style | Format, Cells..., Number tab |  | ||
| increase decimal | Format, Cells..., Number tab |  | Select the cell or cells then use the menu or toolbar. Each cell must display a numeric value for this formatting to work. | |
| decrease decimal | Format, Cells..., Number tab |  | ||
| increase indent | Format, Cells..., Alignment tab |  | Select the cell or cells then use the menu or toolbar. | |
| decrease indent | Format, Cells..., Alignment tab |  | ||
| cell borders | Format, Cell..., Border tab |  | Select the cell or cells then use the menu or toolbar. This toolbar button contains a drop down list where you select the type of location of the border for the selected cells. | |
| fill color | Format, Cell..., Pattern tab |  | Select the cell or cells then use the menu or toolbar. This toolbar button contains a drop down list where you select the fill color you want for the cells. | |
| font color | Format, Cell..., Font tab |  | Select the cell or cells then use the menu or toolbar. This toolbar button contains a drop down list where you select the font color you want for the selected cells. | |
Additional formatting options, listed alphabetically. | ||||
| page break | Insert, Break..., Page Break | <Ctrl> <Enter> | Position the cursor where you want the page break then use the menu or keyboard shortcut. | |
Note that the keyboard shortcut <Ctrl> 1 will display the Format Cells dialog box. This dialog box contains six tabs.
Format Cells Number tab
| The Number tab is used to format data in the selected cell or cells.
The list displayed in Category provides predefined formatting that you can apply to numeric and text data. Since a worksheet typically contains umeric data, the majority of the predefined formats are for numeric data. When you select a category from the list, options will appear to the right of the list. (The options associated with the Number category are shown.) These options allow you more control over how you want to apply the selected category format. | 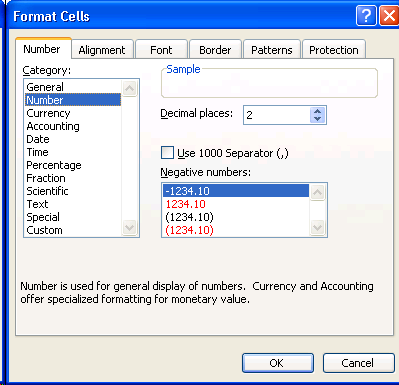 |
Format Cells Alignment tab
| The Alignment tab is used to align the data in the selected cell or cells.
The Text Alignment options include Horizontal, Vertical, and Indent. The Horizontal alignment dropdown list duplictes the capabilities of the Align Left, Center, and Align Right toolbar buttons. The Vertical alignment dropdown list is useful when a row height is much larger than the amout of data to be displayed in a cell of that row. The Indent dropdown list duplicates the capabilities of Increase Indent and Decrease Indent toolbar buttons. The Text Control options include wrap text, shrink to fit, and merge cells. Wrap text is typically used when a cell contains lots of text and you do not want to adjust the column width to display all of the text in one line. Merge cells, when combined with horizontal center alignment, duplicates the Merge & Center toolbar button. The Orientation options allow you to change how the data is displayed in the selected cells. You can either drag and drop the red diamond or change the Degress value. | 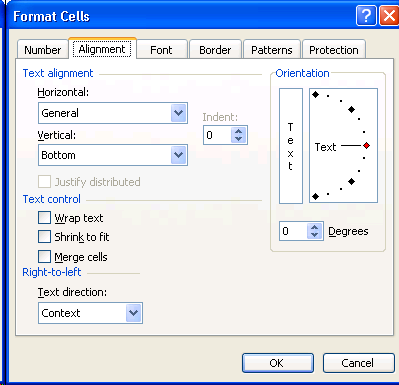 |
Format Cells Font tab
| The Font tab is used to change the font attributes for the selected cell or cells.
The strikethrough, superscript, and subscript effects allows you to add special font attributes to the selected cells. All other features on this tab are available to you on the Formatting toolbar. | 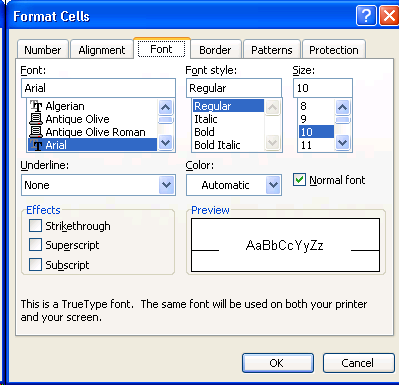 |
Format Cells Border tab
| The Border tab is used to specify add/remove border settings for the selected cell or cells.
Using this tab, you can change the style or color of a cell border, and add/remove a border along any of the cell edges. The large white box containing the words Text shows the current border settings. You may click on an "edge" inside this white box to add/remove the edge. When the selected range of cells includes multiple rows, a horizontal border exists in the middle of this white box (this horizontal border appears as a dashed line in the picture). Similarly, when the selected range of cells includes multiple columns, a vertical border exists in the middle of this white box (this vertical border appears as a dotted line in the picture). | 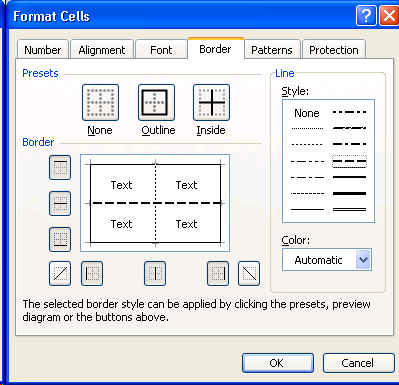 |
Format Cells Patterns tab
| The Patterns tab is used to specify fill effects for the selected cell or cells.
You may select a color and/or a pattern for your fill effect. | 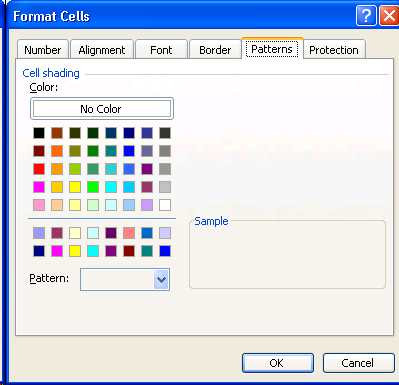 |
Format Cells Protection tab
| The Protection tab works in conjunction with the Tools, Protection menu item. | 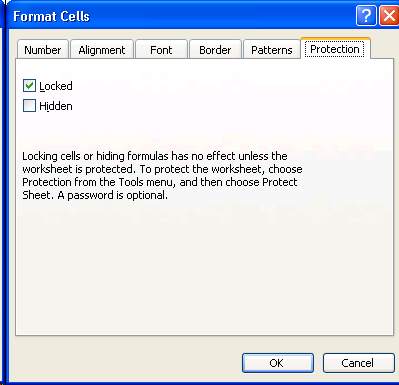 |
 .
. .
.