|
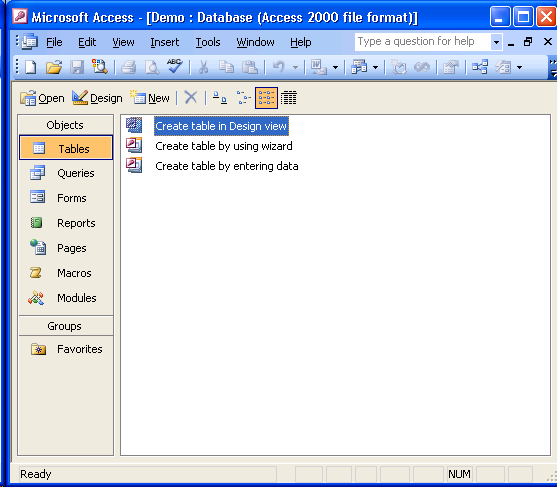
When creating a new Access database, the first thing you should do is create one or more table objects. As shown in the picture to the right, clicking on the Table object type displays three methods for creating a new table object:
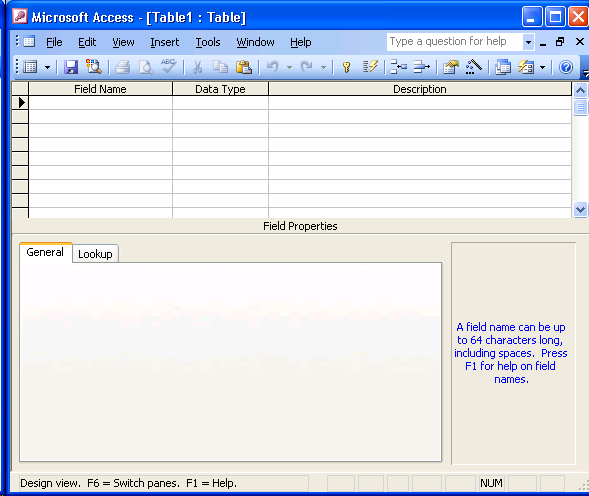
In this class, we will always use Design view to create a table. The easiest way to create a table using design view is to double-click on the "Create table in Design view" entry. You may also click on the "New" button (see  You would then select "Design view" and click the "OK" button. In either case, a new child window is shown that is called the table design view: |
|
|
The table design view contains two sections.
In the picture to the left, the table design view is empty because we are creating a new table object in the database. What is a field in a table?A field represents a distinct piece of data associated with a real or imaginary entity. For example, let's say we want to store data about a student. We may want to know a student's name, address, phone number, and major. So each of these are candidates for becoming a field in a student table. This seems simple enough. However, things are not as easy as they appear. How do we identify the fields that we need in a table?Let's say that we want to create a field for a student's name.
|
|
We have similar issues when we think about a student's address. That is, there are many distinct pieces of information associated with an address - street address, city, state, zip code. For student's living in an appartment or dormitory, you would also have an appartment number or room number. |
|
How do we create a field definition in a table?So let's assume that we want to have two fields for a student's name - first name and last name - and that we do not care about a students middle name. The following steps are used to create the first field definition:
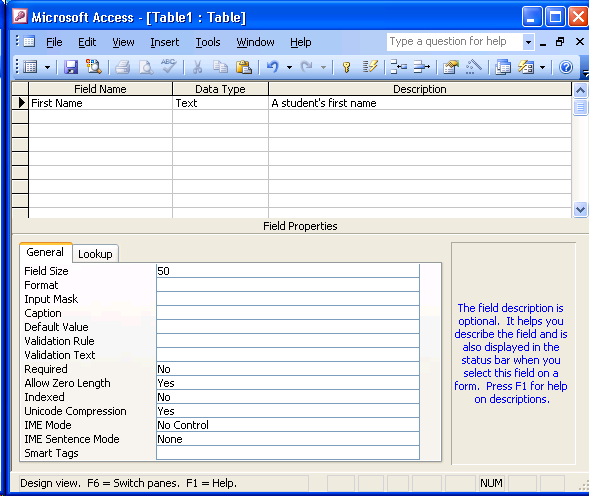
The picture to the right shows what the table design view looks like immediately after you've typed in the description. (Note: at this point, the cursor is still in the Description field of the First Name field/row. |
|
Observations at this point
For the Text Data Type, Field Size represents the maximum number of characters a value may contain for this field. You should decide what the maximum number of characters should be for each field whose Data Type is Text, and then change the Field Size property value for the field. Note that the maximum Field Size property value for the Text Data Type is 255. (For purposes of this demonstration, the Field Size property value will be changed to 20 for the First Name field.) As you tab through the Field Name, Data Type, and Description cells in the first row of the First Name field definition, you'll see this blue text display help text based on which of the three cells the cursor is in. |
|
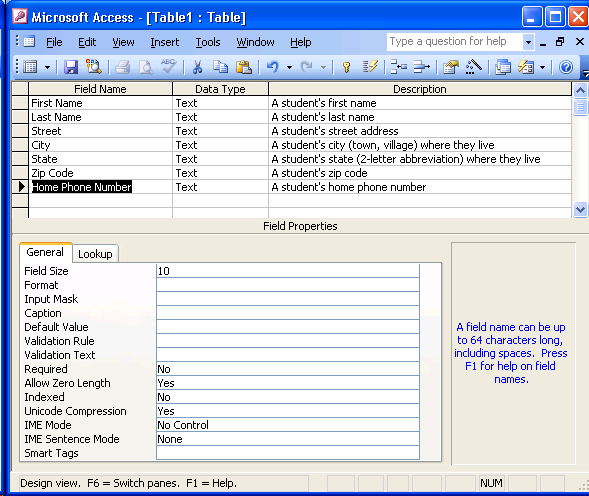
Create remaining fieldsAfter creating the Last Name field, and other appropriate fields used for contacting a student, the Table Design View looks like the window on the right. Notice that the Home Phone Number field is a Text field whose Field Size is 10. This allows for a 3-digit area code, 3-digit exchange, and 4-digit extension. Even though phone numbers in the U.S. are numeric, the Data Type of the Home Phone Number field is Text. Generally, you should not use a numeric data type for a field unless you need to use arithmetic operators on the field value. Since it is difficult to imagine a scenario where we would need to do arithmetic (i.e., addition, subtraction) on a phone number value, we've used the Text Data Type. Does it matter how we order the fields in the top section?The short answer is no - it does not matter how we order the fields in the Field Definition list. |
|
Save table definitionNow that we've created all of the fields for this table, we need to save the table definition. You may save the table by doing any of the following: |
|
In either case, the Save As dialog box (shown to the right) will appear. At this point, you type in the name for the Table (in this case - Student) and click the OK button. |
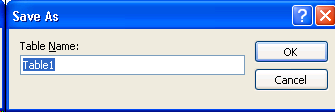
|
|
|
|
At this point, Microsft Access warns you that you have not yet saved the table design (as shown to the right). |

|
|
If you select the Yes button, the Save As dialog box (shown to the right) is displayed. You would then enter your table name and click the OK button. If you select the No button, your table design is not saved. (You will have to reenter all of the Field Definition and Field Property values.) If you select the Cancel button, the Table Design view remains open and you may modify this design. |

|
|
Assuming that you entered a table name and clicked OK in the Save As dialog box, a warning about missing primary keys is then displayed (shown immediately below). 
|
|
|
Here are the three options available to us:
Microsoft Access will save the table design using the table name you entered. In addition, Microsoft Access automatically adds a new field to your table design, and makes this new field the primary key. This new field will have a Data Type of AutoNumber. In some cases, it is appropriate to have Access automatically create a primary key field. Microsoft Access will save the table design using the table name you entered. At this point, the table does not have a primary key. The Table Design view remains open and it has not yet been saved. For this demonstration, the No buton was clicked. At this point, the Student table design has been saved in the database file, and Microsft Access displays the Database Window (as shown on the right). Note that below the three "Create Table ..." options is the word Student. This represents the Student table that we just saved to the database file. |
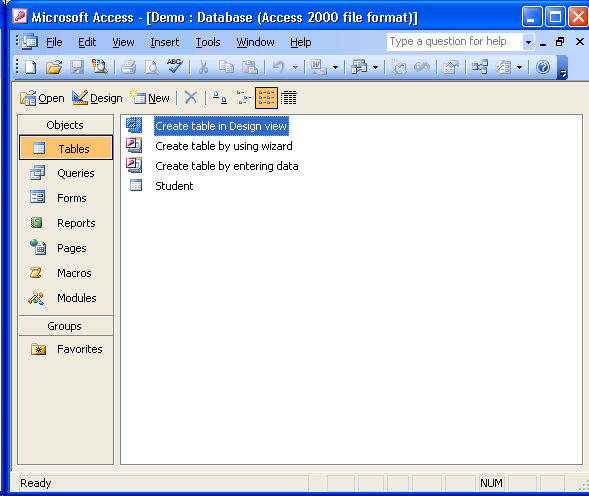
|
What is a primary key?A primary key is one or more fields whose values will uniquely identify each data row in the table. In the case of our Student table - can we identify one or more fields whose values will collectively identify each student data stored in the table?
In the final analysis, it looks like we should add another field to this table - called Student ID Number - and we should make this field the primary key. |
|
Adding a field to an existing TableTo add a field to the Student table, we must first open the table in Design View. We can do this by:
The picture on the right shows the Table Design View for the Student table. We now want to add a field called Student ID Number to the field list.
In this case we would type in the Field Name, Data type, and Description in the first empty row immediately below the last field listed. To do this, we would position the cursor in a particular field (notice that the First Name Field Name is selected in the picture to the right) and then stike the Insert key on the keyboard (or select Insert, Rows from the menu). |
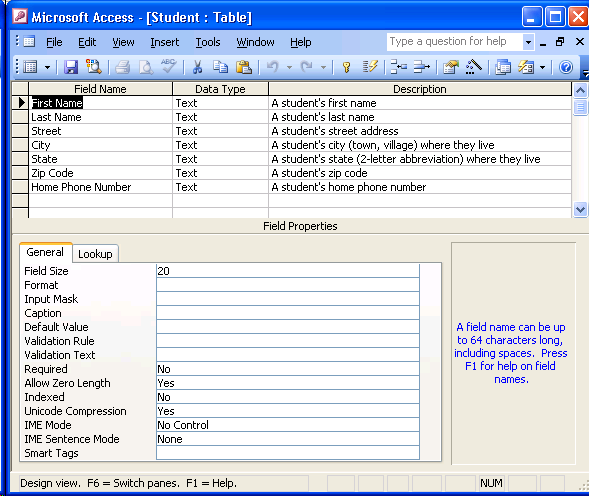
|
|
Let's insert this new field immediately before the Street field in the list. To the right is what the field list would look like after positioning the cursor in the Street field and striking the Insert key on the keyboard. At this point, we would type in Student ID Number in the Field Name, and then tab over to the Description field and type in an appropriate description for this new field. (For purposes of this demo database, I made the Field Size of this field 15.) |

|
|
Now that we've created the Student ID Number field, we need to make this field the primary key:
You should see a little key symbol to the left of the Student ID Number field. Save the changes you've made to the Student table design and close the Table Design View. If you were to reopen the Table Design View for the Student table, the field list should look like the following: |

|
For more information on the Table Design View, see field data types and field properties.
 ) to display the "New Table" dialog box.
 button or selecting Save from the File menu.
 button associated with the Table Design child window.
 button or select Primary Key from the Edit menu.


 allow you to move to different rows in the Datasheet View.
 button moves the cursor to the first row in the datasheet view.
 button moves the cursor to the previous row in the datasheet view.
 button moves the cursor to the next row in the datasheet view.
 button moves the cursor to the last row that contains data in the datasheet view.
 button moves the cursor to the asterisk row in the datasheet view, allowing the user to enter a new data row.
 textbox indicates which row the cursor is currently in, and allows you to navigate to a specific row number. Clicking on this textbox, entering a number, and striking the enter key will move the cursor to the specified row. Note the of 3 at the end of these navigation buttons. This indicates the total number of data rows currently in the table.
 shows the description associated with the First Name field.
